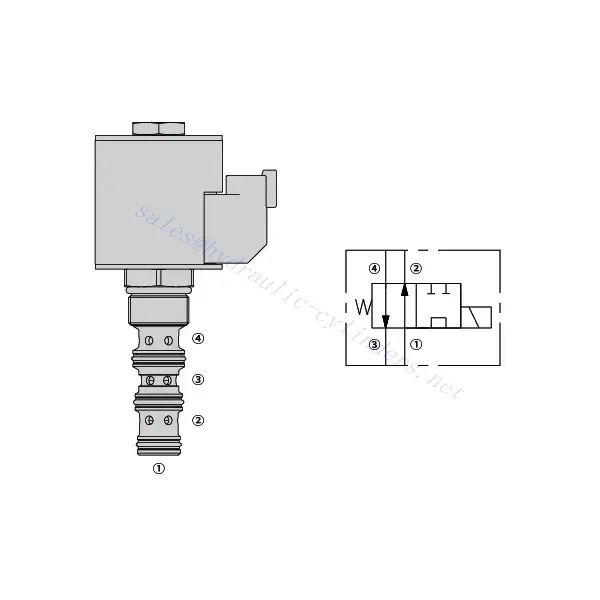
30SD10-44 Solenoid Directional Valve
Als einer der Hersteller, Lieferanten und Exporteure von mechanischen Produkten, bieten wir Hydraulikzylinder und viele andere Produkte an.
Bitte setzen Sie sich mit uns in Verbindung, um Einzelheiten zu erfahren.
Post:sales@hydraulic-cylinders.net
Hersteller, Lieferant und Exporteur von Hydraulikzylindern.
30SD10-44 Solenoid Directional Valve

The 30SD10-44 solenoid directional valve is a high-performance hydraulic component designed to provide exceptional efficiency and precise control in a wide range of applications. With advanced engineering and cutting-edge technology, this valve allows for seamless directional control of hydraulic fluid, enabling reliable operation in various industries. From industrial machinery to mobile equipment, the 30SD10-44 solenoid directional valve is the trusted solution for optimizing hydraulic systems.
The 30SD10-44 solenoid directional valve offers exceptional efficiency, control, and durability for hydraulic systems. Its precise directional control capabilities, robust construction, and easy installation make it an excellent choice for various applications. By following the recommended maintenance practices, you can ensure optimal performance and extend the lifespan of this valve. Invest in the 30SD10-44 solenoid directional valve today and experience enhanced efficiency and control in your hydraulic systems.
30SD10-44 Solenoid Directional Valve Characteristics:
- Robust Construction: The 30SD10-44 solenoid directional valve is built to withstand demanding environments. Constructed from high-quality materials, it offers exceptional durability and longevity, ensuring reliable performance even in harsh conditions.
- High Flow Capacity: This valve boasts a high flow capacity, enabling efficient and rapid movement of hydraulic fluid. It facilitates quick response times and enhances the overall productivity of hydraulic systems.
- Easy Installation: The 30SD10-44 solenoid directional valve is designed for hassle-free installation. It features standardized connections and mounting options, making integrating your hydraulic system a breeze.
- Versatile Applications: This valve is suitable for various applications across various industries. Whether in manufacturing, construction, or agriculture, the 30SD10-44 solenoid directional valve can be customized to meet your specific hydraulic control needs.
30SD10-44 Solenoid Directional Valve Parameter:
| Nenndruck | 207 bar (3000 psi) | |
| Spitzenfluss | 23 l/min (6 gpm) | |
| Flüssigkeit | Mineralische oder synthetische Stoffe mit Schmiereigenschaften | |
| Flüssigkeitstemperaturbereich ℃ | -54 bis 107 ℃ (Polyurethan-Dichtungen) | |
| -40 bis 100 °C (Buna N-Dichtungen) | ||
| -26 bis 204 ℃ (Fluorkohlenstoffdichtungen) | ||
| Viskositätsbereich | 7,4 bis 420 mm2/S | |
| Verschmutzungsgrad | Der Mindestverschmutzungsgrad beträgt ISO4406 Stufe 20/18/14, und Stufe 17/15/13 wird empfohlen, um die Lebensdauer zu verlängern | |
| Interne Leckage | ≤ 82 mL/min@207 bar | |
| Hohlraum | VC10-4 | |
| Spulenleistung | Kontinuierlich von 85% bis 115% Nennspannung | |
| Anfängliche Spulenstromaufnahme bei 20 °C | E-Spule | 1,7 A bei 12 VDC; 0,85 A bei 24 VDC |
| D-Spule | 1,67 A bei 12 VDC; 0,83 A bei 24 VDC | |
| Minimale Anzugsspannung | 85% mit einem Nenndruck von 207 bar | |
30SD10-44 Solenoid Directional Valve Advantages:
• Spule für Dauerbetrieb
• Die Kartuschen sind spannungsaustauschbar
• Optionale wasserdichte E-Spulen mit einer Schutzart bis IP69K
• Effiziente Nassarmaturkonstruktion
• Industriell üblicher Hohlraum
• Gehärtete Teile für lange Lebensdauer
Usage Method Of 30SD10-44 Solenoid Directional Valve:
Using the 30SD10-44 solenoid directional valve is straightforward and user-friendly. Here’s a step-by-step guide to get you started:
- Prepare the System: Ensure the hydraulic system is appropriately set up and all necessary components are in place.
- Mount the Valve: Install the 30SD10-44 solenoid directional valve in the desired location within the hydraulic system and secure it tightly using appropriate mounting brackets or fasteners.
- Connect the Plumbing: Connect the hydraulic lines to the valve’s designated ports. Ensure proper alignment and tighten the connections to prevent leaks.
- Electrical Connections: Connect the solenoid valve to the electrical power supply. Follow the wiring diagram provided with the valve to connect the wires and ensure safe operation correctly.
- Test and Adjust: Once the valve is installed and connected, test its functionality by activating the solenoid and observing the directional control of the hydraulic fluid. Make any necessary adjustments to ensure proper operation.
How To Install A Moen Shower Valve Cartridge?
Installing a Moen shower valve cartridge requires careful attention to detail to ensure proper functioning of your shower system. Here’s a step-by-step guide to help you with the installation process:
- Gather the Required Tools: Before starting, gather the necessary tools, including an adjustable wrench, pliers, screwdriver, and a cartridge puller (if needed).
- Turn Off the Water Supply: Locate the main water shut-off valve for your house and turn it off to stop the water flow to the shower. If you have a dedicated shut-off valve for the shower, you can use that instead.
- Remove the Handle and Trim: Remove the handle by locating the set screw or screw cover on the handle and using a screwdriver or Allen wrench to loosen and remove it. Once the screw is removed, pull the handle off. Next, remove the trim plate or escutcheon surrounding the valve using a screwdriver.
- Take Out the Old Cartridge: Depending on the Moen shower valve model, the cartridge removal method may vary. Some cartridges can be pulled out by hand, while others may require a cartridge puller. If your cartridge is stubborn and won’t come out easily, refer to the manufacturer’s instructions or consult a professional for assistance.
- Prepare the New Cartridge: Before installing the new cartridge, make sure it matches the model and type specified by Moen for your shower valve. Follow any included instructions or guidelines provided with the cartridge.
- Install the New Cartridge: Insert the new cartridge into the valve body, aligning it properly. Push it firmly but gently until it is fully seated in the valve. Ensure that it is correctly aligned with any tabs or grooves in the valve body.
- Reassemble the Trim and Handle: Replace the trim plate or escutcheon over the valve and secure it with screws. Then, slide the handle back onto the valve stem and tighten the set screw or screw cover to secure it in place.
- Turn On the Water Supply: Once the cartridge and handle are securely in place, turn on the main water supply or dedicated shower shut-off valve to restore the water flow to the shower.
- Test the Functionality: Turn on the shower to test the new cartridge’s functionality. Check for any leaks, unusual noises, or issues with water flow and temperature. Make any necessary adjustments to ensure smooth operation.
Fähigkeit und Kapazität der Fabrik:
(1) Montage
Wir verfügen über eine erstklassige, unabhängige Forschungs- und Entwicklungsmontageplattform. Die Hydraulikzylinder-Produktionswerkstatt verfügt über vier halbautomatische Montagelinien für Hubzylinder und eine automatische Montagelinie für Kippzylinder mit einer geplanten jährlichen Produktionskapazität von 1 Million Stück. Die Spezialzylinderwerkstatt ist mit verschiedenen Spezifikationen eines halbautomatischen Reinigungsmontagesystems mit einer geplanten jährlichen Produktionskapazität von 200.000 ausgestattet und mit renommierten CNC-Bearbeitungsgeräten, einem Bearbeitungszentrum, einer hochpräzisen Spezialausrüstung für die Zylinderverarbeitung, einer Roboterschweißmaschine, einer automatischen Reinigungsmaschine, einer automatischen Zylindermontagemaschine und einer automatischen Lackierproduktionslinie ausgestattet. Es sind mehr als 300 Sets (Sätze) an kritischer Ausrüstung vorhanden. Die optimale Zuweisung und effiziente Nutzung der Ausrüstungsressourcen gewährleistet die Genauigkeitsanforderungen der Produkte und erfüllt die hohen Qualitätsanforderungen der Produkte.


(2) Bearbeitungen
Die Bearbeitungswerkstatt ist mit einem maßgeschneiderten Schrägschienen-Drehzentrum, einem Bearbeitungszentrum, einer Hochgeschwindigkeits-Honmaschine, einem Schweißroboter und anderen zugehörigen Geräten ausgestattet, die die Bearbeitung von Zylinderrohren mit einem maximalen Innendurchmesser von 400 mm und einer maximalen Länge von 6 Metern ermöglichen.

(3) Schweißen

(4) Malerei und Beschichtung
Mit kleinen und mittleren Zylinder automatische Lackieranlagen auf Wasserbasis, zu erreichen automatische Roboter Be-und Entladen und automatische Spritzen, die Design-Kapazität von 4000 Stück pro Schicht;
Wir verfügen auch über eine halbautomatische Lackieranlage für große Zylinder, die von einer Energiekette angetrieben wird und eine Kapazität von 60 Kisten pro Schicht hat.


(5) Prüfung
Wir verfügen über erstklassige Prüfeinrichtungen und Prüfstände, um sicherzustellen, dass die Leistung des Zylinders den Anforderungen entspricht.

Wir sind einer der besten Hydraulikzylinderhersteller. Wir können umfassende Hydraulikzylinder anbieten. Wir bieten auch entsprechende landwirtschaftliche Getriebe. Wir haben unsere Produkte an Kunden weltweit exportiert und uns aufgrund unserer hervorragenden Produktqualität und unseres Kundendienstes einen guten Ruf erworben. Wir begrüßen Kunden im In- und Ausland, die uns kontaktieren, um Geschäfte zu verhandeln, Informationen auszutauschen und mit uns zusammenarbeiten!
Hydraulischer Zylinder Anwendung:
