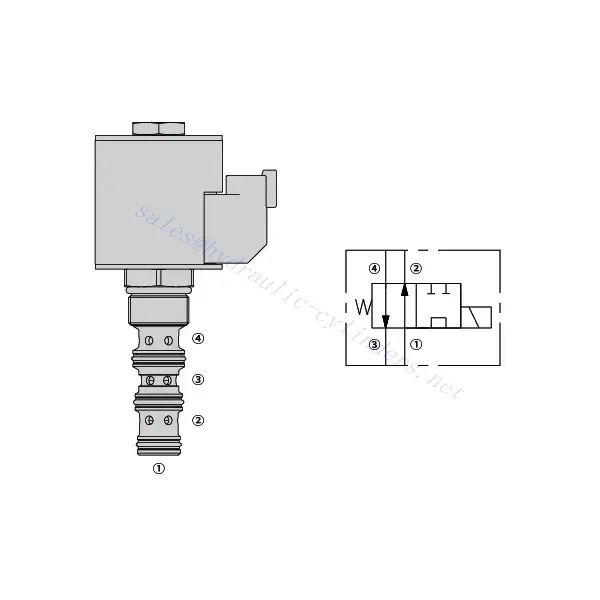
30SD10-44 Solenoid Directional Valve
Como cilindros hidráulicos uno de los fabricantes, los surtidores y los exportadores de productos mecánicos, ofrecemos cilindros hidráulicos y muchos otros productos.
Póngase en contacto con nosotros para más información.
Correo:sales@hydraulic-cylinders.net
Fabricante proveedor exportador de cilindros hidráulicos.
30SD10-44 Solenoid Directional Valve

The 30SD10-44 solenoid directional valve is a high-performance hydraulic component designed to provide exceptional efficiency and precise control in a wide range of applications. With advanced engineering and cutting-edge technology, this valve allows for seamless directional control of hydraulic fluid, enabling reliable operation in various industries. From industrial machinery to mobile equipment, the 30SD10-44 solenoid directional valve is the trusted solution for optimizing hydraulic systems.
The 30SD10-44 solenoid directional valve offers exceptional efficiency, control, and durability for hydraulic systems. Its precise directional control capabilities, robust construction, and easy installation make it an excellent choice for various applications. By following the recommended maintenance practices, you can ensure optimal performance and extend the lifespan of this valve. Invest in the 30SD10-44 solenoid directional valve today and experience enhanced efficiency and control in your hydraulic systems.
30SD10-44 Solenoid Directional Valve Characteristics:
- Robust Construction: The 30SD10-44 solenoid directional valve is built to withstand demanding environments. Constructed from high-quality materials, it offers exceptional durability and longevity, ensuring reliable performance even in harsh conditions.
- High Flow Capacity: This valve boasts a high flow capacity, enabling efficient and rapid movement of hydraulic fluid. It facilitates quick response times and enhances the overall productivity of hydraulic systems.
- Easy Installation: The 30SD10-44 solenoid directional valve is designed for hassle-free installation. It features standardized connections and mounting options, making integrating your hydraulic system a breeze.
- Versatile Applications: This valve is suitable for various applications across various industries. Whether in manufacturing, construction, or agriculture, the 30SD10-44 solenoid directional valve can be customized to meet your specific hydraulic control needs.
30SD10-44 Solenoid Directional Valve Parameter:
| Presión nominal | 207 bar (3000 psi) | |
| Flujo máximo | 23 L/min (6 galones por minuto) | |
| Líquido | De base mineral o sintética con propiedades lubricantes | |
| Rango de temperatura del fluido ℃ | -54 a 107 ℃ (Sellos de poliuretano) | |
| -40 a 100 ℃ (sellos Buna N) | ||
| -26 a 204 ℃ (sellos de fluorocarbono) | ||
| Rango de viscosidad | 7,4 a 420 mm2/s | |
| Grado de contaminación | El nivel mínimo de contaminación es el nivel 20/18/14 de la norma ISO 4406, y se recomienda el nivel 17/15/13 para prolongar la vida útil. | |
| Fuga interna | ≤ 82 mL/min@207 bar | |
| Cavidad | VC10-4 | |
| Clasificación de servicio de la bobina | Continua desde 85% hasta 115% de tensión nominal | |
| Consumo de corriente inicial de la bobina a 20 ℃ | Bobina electrónica | 1,7 A a 12 V CC; 0,85 A a 24 V CC |
| Bobina D | 1,67 A a 12 V CC; 0,83 A a 24 V CC | |
| Tensión mínima de entrada | 85% de potencia nominal a 207 bar | |
30SD10-44 Solenoid Directional Valve Advantages:
• Bobina con clasificación de servicio continuo
• Los cartuchos son intercambiables en voltaje.
• Bobinas E impermeables opcionales con clasificación hasta IP69K
• Construcción eficiente de armadura húmeda
• Cavidad común en la industria
• Piezas endurecidas para una larga vida útil
Usage Method Of 30SD10-44 Solenoid Directional Valve:
Using the 30SD10-44 solenoid directional valve is straightforward and user-friendly. Here’s a step-by-step guide to get you started:
- Prepare the System: Ensure the hydraulic system is appropriately set up and all necessary components are in place.
- Mount the Valve: Install the 30SD10-44 solenoid directional valve in the desired location within the hydraulic system and secure it tightly using appropriate mounting brackets or fasteners.
- Connect the Plumbing: Connect the hydraulic lines to the valve’s designated ports. Ensure proper alignment and tighten the connections to prevent leaks.
- Electrical Connections: Connect the solenoid valve to the electrical power supply. Follow the wiring diagram provided with the valve to connect the wires and ensure safe operation correctly.
- Test and Adjust: Once the valve is installed and connected, test its functionality by activating the solenoid and observing the directional control of the hydraulic fluid. Make any necessary adjustments to ensure proper operation.
How To Install A Moen Shower Valve Cartridge?
Installing a Moen shower valve cartridge requires careful attention to detail to ensure proper functioning of your shower system. Here’s a step-by-step guide to help you with the installation process:
- Gather the Required Tools: Before starting, gather the necessary tools, including an adjustable wrench, pliers, screwdriver, and a cartridge puller (if needed).
- Turn Off the Water Supply: Locate the main water shut-off valve for your house and turn it off to stop the water flow to the shower. If you have a dedicated shut-off valve for the shower, you can use that instead.
- Remove the Handle and Trim: Remove the handle by locating the set screw or screw cover on the handle and using a screwdriver or Allen wrench to loosen and remove it. Once the screw is removed, pull the handle off. Next, remove the trim plate or escutcheon surrounding the valve using a screwdriver.
- Take Out the Old Cartridge: Depending on the Moen shower valve model, the cartridge removal method may vary. Some cartridges can be pulled out by hand, while others may require a cartridge puller. If your cartridge is stubborn and won’t come out easily, refer to the manufacturer’s instructions or consult a professional for assistance.
- Prepare the New Cartridge: Before installing the new cartridge, make sure it matches the model and type specified by Moen for your shower valve. Follow any included instructions or guidelines provided with the cartridge.
- Install the New Cartridge: Insert the new cartridge into the valve body, aligning it properly. Push it firmly but gently until it is fully seated in the valve. Ensure that it is correctly aligned with any tabs or grooves in the valve body.
- Reassemble the Trim and Handle: Replace the trim plate or escutcheon over the valve and secure it with screws. Then, slide the handle back onto the valve stem and tighten the set screw or screw cover to secure it in place.
- Turn On the Water Supply: Once the cartridge and handle are securely in place, turn on the main water supply or dedicated shower shut-off valve to restore the water flow to the shower.
- Test the Functionality: Turn on the shower to test the new cartridge’s functionality. Check for any leaks, unusual noises, or issues with water flow and temperature. Make any necessary adjustments to ensure smooth operation.
Capacidad de la fábrica:
(1) Montaje
Contamos con una plataforma de ensamblaje independiente de primera clase para investigación y desarrollo. El taller de producción de cilindros hidráulicos cuenta con cuatro líneas de ensamblaje de cilindros de elevación semiautomáticos y una línea de ensamblaje de cilindros de inclinación automáticos, con una capacidad de producción anual diseñada de 1 millón de piezas. El taller de cilindros especiales está equipado con un sistema de ensamblaje de limpieza semiautomático de diversas especificaciones, con una capacidad de producción anual diseñada de 200,000 unidades, y está equipado con reconocidos equipos de mecanizado CNC, un centro de mecanizado, equipos especiales de procesamiento de cilindros de alta precisión, una máquina de soldadura robotizada, una máquina de limpieza automática, una máquina de ensamblaje de cilindros automáticos y una línea de producción de pintura automática. Contamos con más de 300 equipos críticos. La asignación óptima y el uso eficiente de los recursos de equipo garantizan la precisión y la alta calidad de los productos.


(2) Mecanizado
El taller de mecanizado está equipado con un centro de torneado de carril inclinado personalizado, un centro de mecanizado, una máquina de bruñido de alta velocidad, un robot de soldadura y otros equipos relacionados, que pueden procesar tubos cilíndricos con un diámetro interior máximo de 400 mm y una longitud máxima de 6 metros.

(3) Soldadura

(4) Pintura y revestimiento
Con pequeñas y medianas líneas de cilindros automáticos de recubrimiento de pintura a base de agua, para lograr la carga y descarga automática de robots y pulverización automática, la capacidad de diseño de 4000 piezas por turno;
También disponemos de una línea semiautomática de producción de pintura para grandes cilindros accionada por cadena, con una capacidad de diseño de 60 cajas por turno.


(5) Pruebas
Disponemos de instalaciones de inspección y bancos de pruebas de primera clase para garantizar que el rendimiento del cilindro cumple los requisitos.

Somos uno de los mejores fabricantes de cilindros hidráulicos. Ofrecemos cilindros hidráulicos integrales. También proporcionamos... cajas de cambios agrícolasHemos exportado nuestros productos a clientes de todo el mundo y nos hemos ganado una excelente reputación gracias a nuestra excelente calidad y servicio posventa. Invitamos a clientes nacionales e internacionales a contactarnos para negociar negocios, intercambiar información y... colabore con nosotros!
Cilindro hidráulico Aplicación:
