


30SD38-38 Elektrozawór kierunkowy

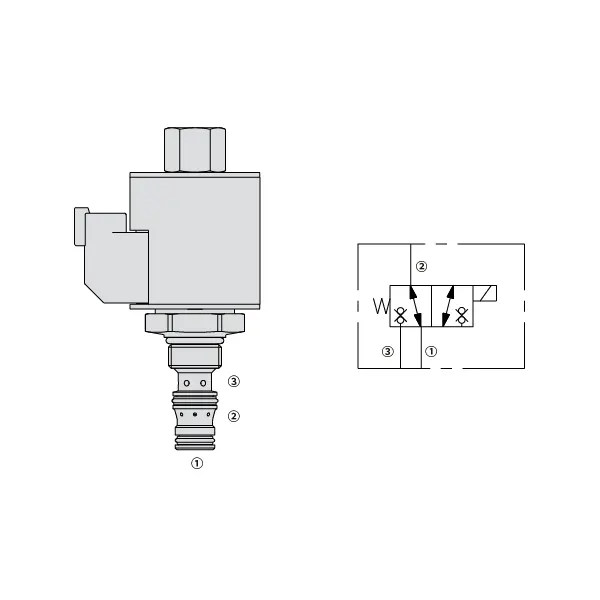
Elektrozawór kierunkowy 30SD38-38 to wysoce wydajny i wszechstronny element, który odgrywa kluczową rolę w systemach sterowania przepływem cieczy. Zawór ten został zaprojektowany z myślą o precyzyjnym i niezawodnym sterowaniu przepływem cieczy, oferując wyjątkową wydajność i trwałość.
Elektrozawór kierunkowy 30SD38-38 to niezawodne i wydajne rozwiązanie do sterowania przepływem cieczy w różnych zastosowaniach przemysłowych. Dzięki solidnej konstrukcji, wysokiej wydajności i wszechstronnym możliwościom montażu, zawór ten zapewnia precyzyjną kontrolę przepływu cieczy i poprawia ogólną wydajność systemu. Przestrzegając prawidłowych metod użytkowania i regularnie przeprowadzając konserwację, można zapewnić optymalną funkcjonalność i trwałość elektrozaworu kierunkowego 30SD38-38, co czyni go doskonałym wyborem do sterowania przepływem cieczy.
Charakterystyka zaworu elektromagnetycznego 30SD38-38:
- Solidna konstrukcja: Elektromagnetyczny zawór kierunkowy 30SD38-38 jest wykonany z wysokiej jakości materiałów, co zapewnia trwałość oraz odporność na zużycie i korozję. Jego solidna konstrukcja pozwala mu wytrzymać trudne warunki pracy, dzięki czemu nadaje się do różnorodnych zastosowań przemysłowych.
- Wydajna praca: Zasilany elektromagnesem, zawór ten zapewnia szybki czas reakcji, umożliwiając szybką regulację przepływu i ciśnienia cieczy. Wydajna praca gwarantuje precyzyjną kontrolę i bezproblemową integrację z procesami zautomatyzowanymi.
- Wszechstronne opcje montażu: Zawór oferuje elastyczne opcje montażu, w tym konfigurację szeregową, kolektorową lub płytową. Ta wszechstronność umożliwia łatwą instalację i integrację z różnymi systemami sterowania przepływem, dostosowując się do zróżnicowanych wymagań aplikacyjnych.
Parametry zaworu elektromagnetycznego 30SD38-38:
| Ciśnienie znamionowe | 207 barów (3000 psi) | |
| Przepływ szczytowy | Zobacz wykres wydajności | |
| Wyciek wewnętrzny | ≤5 kropli/min@207bar | |
| Obciążenie cewki | Ciągły od 85% do 115% napięcia znamionowego | |
| Początkowy pobór prądu cewki przy 20°C | Cewka elektroniczna | 1,7 A przy 12 V DC; 0,85 A przy 24 V DC |
| Cewka D | 1,67 A przy 12 V DC; 0,83 A przy 24 V DC | |
| Minimalne napięcie wciągania | 85% o wartości nominalnej przy ciśnieniu 207 barów (3000 psi) | |
| Wgłębienie | VC08-3 | |
| Płyn | Mineralne lub syntetyczne o właściwościach smarujących | |
| Zakres temperatury płynu ℃ | -54 do 107 ℃ (uszczelki poliuretanowe) | |
| -40 do 100 ℃ (uszczelki Buna N) | ||
| -26 do 204 ℃ (uszczelki fluorowęglowe) | ||
| Zakres lepkości | 7,4 do 420 mm2/S | |
| Stopień skażenia | Minimalny poziom zanieczyszczenia to ISO4406 poziom 20/18/14, a w celu wydłużenia żywotności zaleca się poziom 17/15/13 | |
Zalety elektrozaworu kierunkowego 30SD38-38:
• Cewka o pracy ciągłej
• Wkłady są wymienne pod względem napięcia
• Opcjonalne wodoodporne cewki elektryczne o klasie ochrony IP69K
• Wydajna konstrukcja armatury mokrej
• Wspólna wnęka przemysłowa
• Utwardzone części zapewniające długą żywotność
Sposób użycia zaworu elektromagnetycznego 30SD38-38:
- Określ wymagania aplikacji: Określ specyficzne potrzeby systemu w zakresie kontroli przepływu cieczy. Weź pod uwagę takie czynniki, jak natężenie przepływu, ciśnienie i kierunek, aby wybrać odpowiednią konfigurację zaworów.
- Mount the valve: Choose the suitable mounting option based on your system’s layout and available space. Ensure that the valve is securely positioned and aligned with the fluid lines.
- Podłącz przewody cieczowe: Użyj kompatybilnych złączek i armatury, aby zapewnić niezbędne połączenia między zaworem a przewodami cieczowymi. Upewnij się, że połączenia są szczelne i szczelne.
- Electrical connection: Connect the solenoid valve to the appropriate power source following the manufacturer’s instructions. Ensure proper wiring and observe safety precautions.
- Test i regulacja: Po zainstalowaniu i podłączeniu zaworu, stopniowo zwiększaj przepływ cieczy i monitoruj jego zachowanie. Przetestuj różne warunki pracy i dostosuj ustawienia zaworu w razie potrzeby, aby uzyskać pożądaną kontrolę przepływu cieczy.
Jak wymienić wkład zaworu mieszającego wodę w prysznicu?
Replacing a shower mixing valve cartridge is a common DIY task that can help restore proper water temperature and flow control. Here’s a step-by-step guide on how to replace a shower mixing valve cartridge:
- Zbierz niezbędne narzędzia: Przed rozpoczęciem wymiany zbierz następujące narzędzia: klucz nastawny, śrubokręt krzyżakowy, śrubokręt płaski, szczypce, klucz imbusowy (jeśli dotyczy) i wymienny wkład odpowiedni do Twojego modelu zaworu prysznicowego.
- Turn off the water supply: Locate the main water shut-off valve for your home and turn it off to stop the water flow to the shower. If there isn’t a dedicated shut-off valve for the shower, you may need to shut off the main water supply.
- Zdejmij uchwyt i osłonę: Zacznij od zdjęcia uchwytu. W zależności od rodzaju uchwytu, może być konieczne znalezienie śruby regulacyjnej lub ozdobnej zaślepki zakrywającej śrubę. Użyj płaskiego lub krzyżakowego śrubokręta, aby odkręcić śrubę lub podważyć zaślepkę, umożliwiając odłączenie uchwytu. Następnie zdejmij wszelkie osłony lub elementy dekoracyjne wokół zaworu, delikatnie je pociągając lub odkręcając.
- Dostęp do wkładu: W zależności od konstrukcji zaworu, może być konieczne zdemontowanie dodatkowych elementów, aby uzyskać dostęp do wkładu. Może to być nakrętka mocująca, tuleja lub płytka rozety. Użyj odpowiednich narzędzi, aby zdemontować te elementy i odsłonić wkład.
- Wyjmij stary wkład: Po uzyskaniu swobodnego dostępu do wkładu, ostrożnie wyjmij go szczypcami lub specjalistycznym narzędziem do wyjmowania wkładów (jeśli jest dostępne). W razie potrzeby poruszaj nim w przód i w tył. Zachowaj ostrożność, aby nie uszkodzić żadnych przyłączy hydraulicznych w pobliżu.
- Wyczyść korpus zaworu: Przed zainstalowaniem nowego wkładu dokładnie wyczyść korpus zaworu, aby usunąć wszelkie zanieczyszczenia i osady mineralne. Przetrzyj go czystą ściereczką lub, w razie potrzeby, użyj łagodnego środka czyszczącego.
- Zainstaluj nowy wkład: Weź nowy wkład i wyrównaj go z korpusem zaworu, upewniając się, że wszystkie wypustki i nacięcia pasują do siebie. Dociśnij wkład mocno, aż będzie przylegał do korpusu zaworu.
- Złóż zawór ponownie: Załóż z powrotem wszystkie wcześniej zdemontowane elementy, takie jak nakrętkę mocującą, tuleję lub płytkę rozetową. Upewnij się, że są dobrze dokręcone, ale unikaj nadmiernego dokręcania.
- Sprawdź szczelność: Otwórz dopływ wody i uważnie obserwuj zawór pod kątem wycieków. W razie potrzeby dokręć połączenia lub wyreguluj wkład. Sprawdź ustawienia ciepłej i zimnej wody, aby zapewnić odpowiednią temperaturę.
- Reinstall the trim and handle: Once you’ve confirmed that there are no leaks, reinstall the trim or decorative coverings over the valve. Slide the handle back onto the cartridge stem and secure it with the set screw or by replacing the decorative cap.
- Przywróć dopływ wody: Na koniec otwórz główne dopływy wody lub specjalny zawór odcinający prysznic i sprawdź działanie nowego wkładu. Sprawdź, czy temperatura i przepływ wody można płynnie regulować.
Możliwości i pojemność fabryki:
(1) Montaż
Dysponujemy najwyższej klasy niezależną platformą badawczo-rozwojową. Warsztat produkcji siłowników hydraulicznych posiada cztery półautomatyczne linie montażowe siłowników podnoszących i jedną automatyczną linię montażową siłowników przechyłu, o projektowanej rocznej zdolności produkcyjnej 1 miliona sztuk. Specjalny warsztat cylindrów jest wyposażony w różne specyfikacje półautomatycznego systemu montażu czyszczącego o projektowanej rocznej zdolności produkcyjnej 200 000 i wyposażony w słynny sprzęt do obróbki CNC, centrum obróbcze, specjalny sprzęt do precyzyjnej obróbki cylindrów, robot spawalniczy, automatyczna maszyna czyszcząca, automatyczna maszyna do montażu cylindrów i automatyczna linia produkcyjna do malowania. Istniejący krytyczny sprzęt składa się z ponad 300 zestawów. Optymalna alokacja i efektywne wykorzystanie zasobów sprzętowych zapewniają wymagania dotyczące dokładności produktów i spełniają potrzeby wysokiej jakości produktów.


(2) Obróbka
Warsztat obróbki skrawaniem jest wyposażony w niestandardowe centrum tokarskie z pochyloną szyną, centrum obróbcze, szybkobieżną honownicę, robota spawalniczego i inny powiązany sprzęt, który może obsługiwać przetwarzanie rur cylindrycznych o maksymalnej średnicy wewnętrznej 400 mm i maksymalnej długości 6 metrów.


(3) Spawanie


(4) Malowanie i powlekanie
Z małymi i średnimi automatycznymi liniami do powlekania farbami na bazie wody, w celu osiągnięcia automatycznego załadunku i rozładunku robota oraz automatycznego natryskiwania, wydajność projektowa 4000 sztuk na zmianę;
Posiadamy również półautomatyczną linię do produkcji farb do dużych cylindrów napędzaną łańcuchem napędowym, o wydajności 60 skrzyń na zmianę.


(5) Testowanie
Dysponujemy najwyższej klasy urządzeniami kontrolnymi i stanowiskami testowymi, aby zapewnić, że wydajność cylindra spełnia wymagania.


Jesteśmy jednym z najlepszych producentów cylindrów hydraulicznych. Oferujemy kompleksową ofertę cylindrów hydraulicznych. Dostarczamy również… przekładnie rolnicze. Eksportowaliśmy nasze produkty do klientów na całym świecie i zdobyliśmy dobrą reputację dzięki najwyższej jakości produktów i usług posprzedażnych. Zapraszamy klientów w kraju i za granicą do kontaktu z nami w celu negocjacji biznesowych, wymiany informacji i współpracować z nami!