30SD10-44 Solenoid Directional Valve
Fiind unul dintre producătorii, furnizorii și exportatorii de cilindri hidraulici, oferim cilindri hidraulici și multe alte produse.
Vă rugăm să luați legătura cu noi pentru detalii.
Mail:sales@hydraulic-cylinders.net
Producător, furnizor, exportator de cilindri hidraulici.
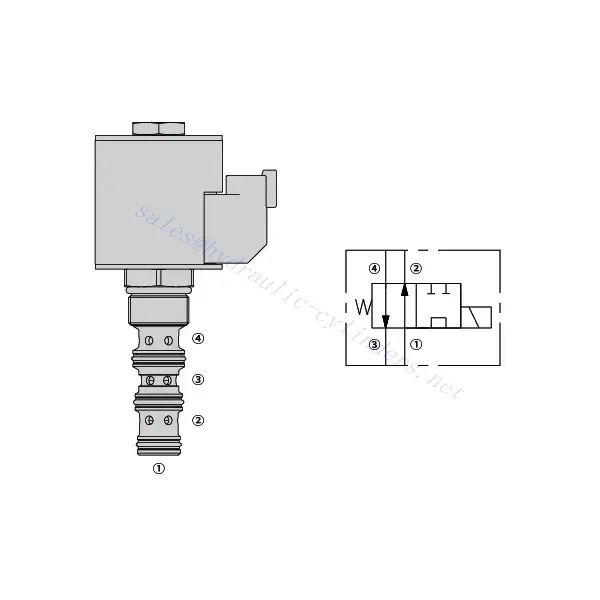
30SD10-44 Solenoid Directional Valve

The 30SD10-44 solenoid directional valve is a high-performance hydraulic component designed to provide exceptional efficiency and precise control in a wide range of applications. With advanced engineering and cutting-edge technology, this valve allows for seamless directional control of hydraulic fluid, enabling reliable operation in various industries. From industrial machinery to mobile equipment, the 30SD10-44 solenoid directional valve is the trusted solution for optimizing hydraulic systems.
The 30SD10-44 solenoid directional valve offers exceptional efficiency, control, and durability for hydraulic systems. Its precise directional control capabilities, robust construction, and easy installation make it an excellent choice for various applications. By following the recommended maintenance practices, you can ensure optimal performance and extend the lifespan of this valve. Invest in the 30SD10-44 solenoid directional valve today and experience enhanced efficiency and control in your hydraulic systems.
30SD10-44 Solenoid Directional Valve Characteristics:
- Robust Construction: The 30SD10-44 solenoid directional valve is built to withstand demanding environments. Constructed from high-quality materials, it offers exceptional durability and longevity, ensuring reliable performance even in harsh conditions.
- Capacitate mare de debit: Această supapă se mândrește cu o capacitate mare de debit, permițând mișcarea eficientă și rapidă a fluidului hidraulic. Facilitează timpi de răspuns rapizi și îmbunătățește productivitatea generală a sistemelor hidraulice.
- Easy Installation: The 30SD10-44 solenoid directional valve is designed for hassle-free installation. It features standardized connections and mounting options, making integrating your hydraulic system a breeze.
- Versatile Applications: This valve is suitable for various applications across various industries. Whether in manufacturing, construction, or agriculture, the 30SD10-44 solenoid directional valve can be customized to meet your specific hydraulic control needs.
30SD10-44 Solenoid Directional Valve Parameter:
| Presiune nominală | 207 bar (3000 psi) | |
| Debit maxim | 23 l/min (6 galoane pe minut) | |
| Fluid | Pe bază de minerale sau sintetice cu proprietăți lubrifiante | |
| Interval de temperatură a fluidului ℃ | -54 până la 107 ℃ (Garnituri din poliuretan) | |
| -40 până la 100 ℃ (etanșări Buna N) | ||
| -26 până la 204 ℃ (etanșări cu fluorocarbon) | ||
| Interval de vâscozitate | 7,4 până la 420 mm2/s | |
| Gradul de contaminare | Nivelul minim de poluare este ISO4406 nivel 20/18/14, iar nivelul recomandat este 17/15/13 pentru a prelungi durata de viață. | |
| Scurgere internă | ≤ 82 mL/min@207 bar | |
| Cavitate | VC10-4 | |
| Capacitate de încărcare a bobinei | Continuu de la 85% la 115% tensiune nominală | |
| Consum inițial de curent al bobinei la 20℃ | Bobină electronică | 1,7A la 12VDC; 0,85A la 24VDC |
| Bobină D | 1,67A la 12VDC; 0,83A la 24VDC | |
| Tensiune minimă de tragere | 85% de presiune nominală la 207 bar | |
30SD10-44 Solenoid Directional Valve Advantages:
• Bobină cu funcție continuă nominală
• Cartușele sunt interschimbabile la tensiune
• Bobine electronice opționale impermeabile, cu grad de protecție IP69K
• Construcție eficientă cu armătură umedă
• Cavitate comună industrială
• Piese călite pentru o durată lungă de viață
Usage Method Of 30SD10-44 Solenoid Directional Valve:
Using the 30SD10-44 solenoid directional valve is straightforward and user-friendly. Here’s a step-by-step guide to get you started:
- Prepare the System: Ensure the hydraulic system is appropriately set up and all necessary components are in place.
- Mount the Valve: Install the 30SD10-44 solenoid directional valve in the desired location within the hydraulic system and secure it tightly using appropriate mounting brackets or fasteners.
- Connect the Plumbing: Connect the hydraulic lines to the valve’s designated ports. Ensure proper alignment and tighten the connections to prevent leaks.
- Conexiuni electrice: Conectați electrovalva la sursa de alimentare electrică. Urmați schema de conectare furnizată împreună cu electrovalva pentru a conecta firele și a asigura o funcționare corectă și în siguranță.
- Testare și reglare: După ce supapa este instalată și conectată, testați funcționalitatea acesteia prin activarea solenoidului și observarea controlului direcțional al fluidului hidraulic. Efectuați toate reglajele necesare pentru a asigura funcționarea corectă.
How To Install A Moen Shower Valve Cartridge?
Installing a Moen shower valve cartridge requires careful attention to detail to ensure proper functioning of your shower system. Here’s a step-by-step guide to help you with the installation process:
- Gather the Required Tools: Before starting, gather the necessary tools, including an adjustable wrench, pliers, screwdriver, and a cartridge puller (if needed).
- Opriți alimentarea cu apă: Localizați robinetul principal de închidere a apei din casa dvs. și închideți-l pentru a opri curgerea apei către duș. Dacă aveți un robinet de închidere dedicat pentru duș, îl puteți folosi în schimb.
- Scoateți mânerul și ornamentul: Scoateți mânerul prin localizarea șurubului de fixare sau a capacului șurubului de pe mâner și folosind o șurubelniță sau o cheie Allen pentru a-l slăbi și a-l scoate. După ce șurubul este scos, trageți mânerul. Apoi, scoateți placa de ornament sau sidecupa care înconjoară robinetul folosind o șurubelniță.
- Take Out the Old Cartridge: Depending on the Moen shower valve model, the cartridge removal method may vary. Some cartridges can be pulled out by hand, while others may require a cartridge puller. If your cartridge is stubborn and won’t come out easily, refer to the manufacturer’s instructions or consult a professional for assistance.
- Prepare the New Cartridge: Before installing the new cartridge, make sure it matches the model and type specified by Moen for your shower valve. Follow any included instructions or guidelines provided with the cartridge.
- Install the New Cartridge: Insert the new cartridge into the valve body, aligning it properly. Push it firmly but gently until it is fully seated in the valve. Ensure that it is correctly aligned with any tabs or grooves in the valve body.
- Reassemble the Trim and Handle: Replace the trim plate or escutcheon over the valve and secure it with screws. Then, slide the handle back onto the valve stem and tighten the set screw or screw cover to secure it in place.
- Turn On the Water Supply: Once the cartridge and handle are securely in place, turn on the main water supply or dedicated shower shut-off valve to restore the water flow to the shower.
- Test the Functionality: Turn on the shower to test the new cartridge’s functionality. Check for any leaks, unusual noises, or issues with water flow and temperature. Make any necessary adjustments to ensure smooth operation.
Capabilitatea și capacitatea fabricii:
(1) Montaj
Avem o platformă de asamblare independentă de cercetare și dezvoltare de primă clasă. Atelierul de producție a cilindrilor hidraulici are patru linii de asamblare semiautomate pentru cilindri de ridicare și o linie de asamblare automată a cilindrilor de înclinare, cu o capacitate de producție anuală proiectată de 1 milion de bucăți. Atelierul de cilindri speciali este echipat cu diverse specificații ale unui sistem de asamblare semi-automat de curățare, cu o capacitate de producție anuală proiectată de 200.000 și dotat cu echipamente celebre de prelucrare CNC, un centru de prelucrare, un echipament special de prelucrare a cilindrilor de înaltă precizie, o mașină de sudură robotizată, o mașină de curățare automată, o mașină de asamblare automată a cilindrilor și o linie de producție automată de vopsire. Echipamente critice existente de peste 300 de seturi (seturi). Alocarea optimă și utilizarea eficientă a resurselor de echipamente asigură cerințele de precizie ale produselor și satisface nevoile de înaltă calitate ale produselor.


(2) Prelucrare
Atelierul de prelucrare este echipat cu un centru de strunjire cu șină înclinată personalizat, un centru de prelucrare, o mașină de honuire de mare viteză, un robot de sudură și alte echipamente conexe, care pot gestiona prelucrarea tuburilor cilindrice cu un diametru interior maxim de 400 mm și o lungime maximă de 6 metri.

(3) Sudură

(4) Vopsire și acoperire
Cu linii automate de acoperire cu vopsea pe bază de apă cu cilindru de dimensiuni mici și medii, pentru a realiza încărcarea și descărcarea automată a robotului și pulverizarea automată, capacitatea de proiectare de 4000 de bucăți pe schimb;
Avem, de asemenea, o linie de producție semi-automată de vopsire pentru cilindri mari, acționată de un lanț de putere, cu o capacitate de proiectare de 60 de cutii pe schimb.


(5) Testarea
Dispunem de instalații de inspecție și bancuri de testare de primă clasă pentru a ne asigura că performanța cilindrului îndeplinește cerințele.

Suntem unul dintre cei mai buni producători de cilindri hidraulici. Putem oferi o gamă completă de cilindri hidraulici. De asemenea, oferim... cutii de viteze agricoleNe-am exportat produsele către clienți din întreaga lume și ne-am câștigat o bună reputație datorită calității superioare a produselor noastre și a serviciilor post-vânzare. Îi invităm pe clienții din țară și din străinătate să ne contacteze pentru a negocia afaceri, a face schimb de informații și... să coopereze cu noi!
Cilindru hidraulic Aplicație:
